
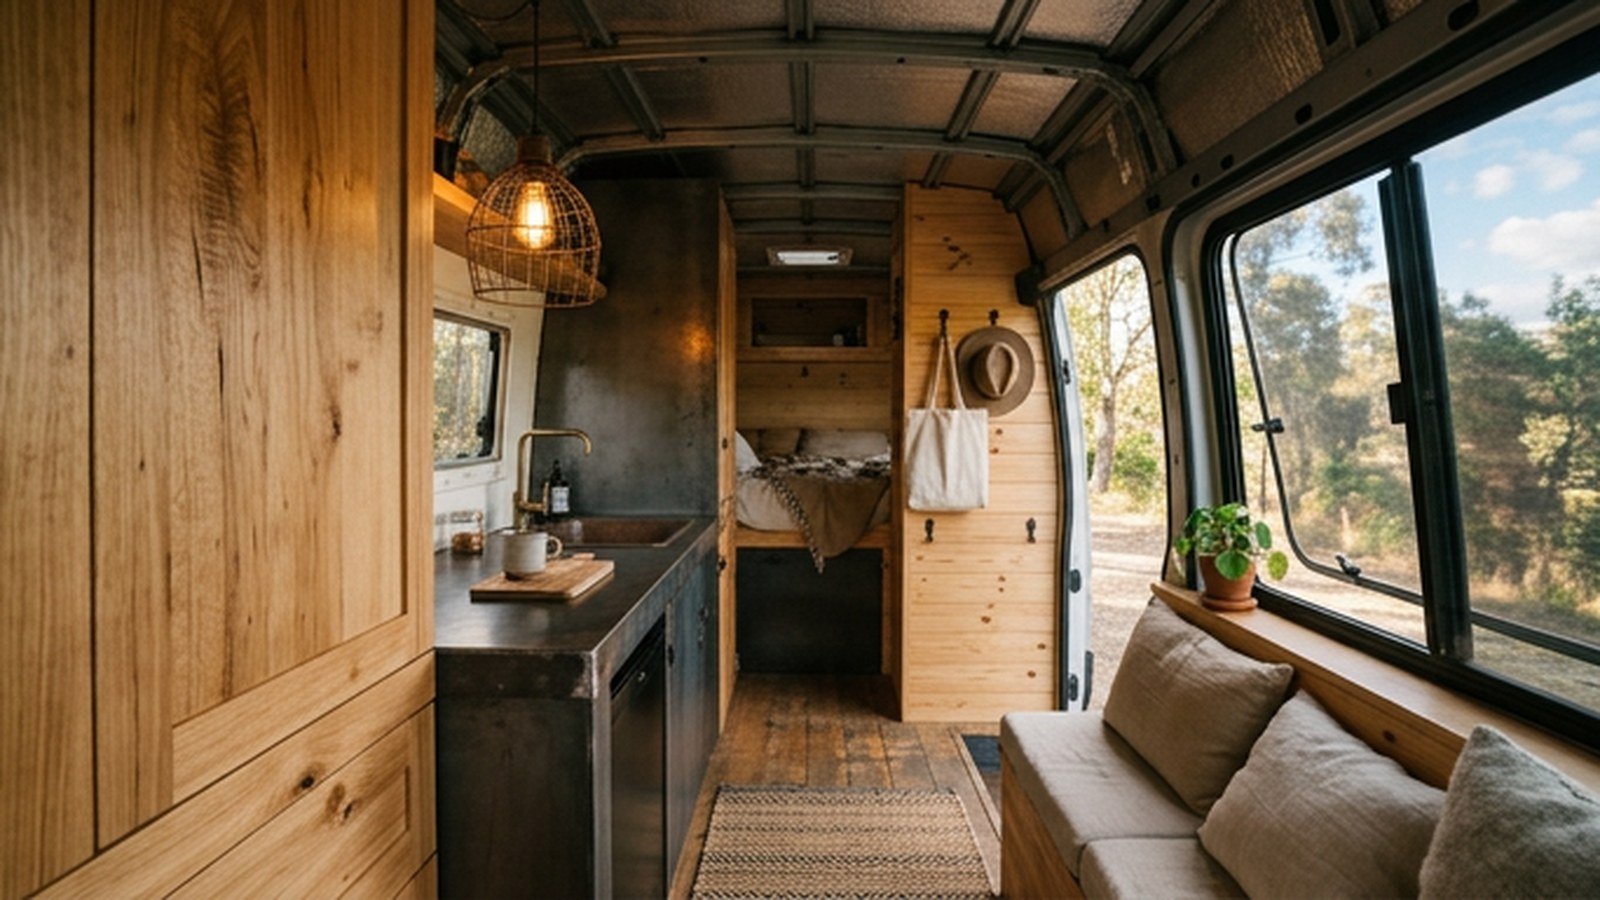
Industrial chic van interiors pair raw steel fixtures with warm wood surfaces to create a build that feels considered rather than merely functional. This aesthetic works because steel and wood contrast in a way that flatters both materials, letting cold hardware read as intentional against the warmth of a wood ceiling or cabinet front. Fifteen concepts below cover the fixtures, finishes, and layout choices that define this look inside a converted van.
I built out my own camper van with an all-wood interior first, then swapped in blackened steel brackets and a raw metal countertop edge partway through, and the difference in how finished the space felt was immediate. Steel adds visual weight in exactly the spots that need it, like shelf brackets and stove surrounds, while wood keeps the overall feel warm rather than cold and industrial throughout. That balance, not an even split, is what actually makes this style work inside a small space.
Below you will find fifteen numbered concepts covering fixtures, surfaces, and lighting, plus a cost comparison table and a rundown of the mistakes that make an industrial build feel unfinished. Each idea includes a sub-angle on cost, sourcing, or what commonly goes wrong so you can plan the build with a realistic budget. By the end you should know exactly which steel elements earn their place and which ones simply add weight to a vehicle that needs to stay light.
Why Steel And Wood Work So Well Together In A Van
Steel and wood succeed together because they occupy opposite ends of the material spectrum, one cold and precise, the other warm and organic, and a small van interior benefits from that tension rather than an all-one-material approach. A van finished entirely in wood can start to feel like a sauna, while one finished entirely in metal reads as a workshop rather than a home. The combination keeps the space feeling both durable and livable.
Weight matters more in a van build than in a house renovation, since every pound of steel added to cabinetry or shelving comes directly out of the vehicle’s payload capacity. Builders working in this aesthetic typically reserve steel for smaller accent pieces, brackets, trim, and hardware, rather than full steel cabinet boxes, keeping the weight budget in check. This selective use of steel is often what separates an experienced industrial-style build from a heavier, less practical one.
| Material Use | Typical Weight Impact | Common Application |
|---|---|---|
| Steel accents | Low, a few pounds total | Brackets, trim, hardware |
| Steel cabinet boxes | High, tens of pounds | Rare in van builds, mostly stationary use |
| Wood cabinetry | Moderate | Main structure and surfaces |
A blackened steel accent package for a van interior, covering brackets, a stove surround, and a few trim pieces, typically adds $600 to $1,500 to a build depending on how much custom fabrication is involved. Powder-coated steel costs somewhat less than a raw blackened finish that requires ongoing rust prevention.
Planning The Steel And Wood Balance Before You Build
Planning starts with deciding where steel will appear before any wood cabinetry gets built, since retrofitting steel accents into finished wood cabinetry is far more disruptive than designing around them from the start. Most experienced builders sketch the full interior layout first, marking specific spots, like a stove surround or shelf brackets, where steel will anchor the design.
Wood species selection matters nearly as much as the steel choice, since a lighter wood like ash or birch plywood contrasts more sharply with dark steel than a already-dark wood like walnut does. Most industrial-style van builds favor a lighter wood tone specifically because it maximizes this contrast against blackened or raw steel accents. Choosing this pairing early keeps the overall palette cohesive rather than muddy.
The biggest planning mistake is treating steel purely as decoration without considering its actual structural or functional role, since a shelf bracket or stove surround should genuinely support weight or provide heat protection, not simply look industrial. Fixtures that serve a real function while also carrying the aesthetic read as more considered than purely decorative steel bolted onto a wall.
Sourcing Steel For A Van Build
Sourcing steel accents for a van build usually means choosing between a local metal fabricator who can custom-cut and finish pieces to spec, or pre-made hardware from a specialty retailer catering to van conversions. Custom fabrication costs more but ensures a precise fit within the van’s specific dimensions, while pre-made hardware is faster and cheaper but may need minor modification. Most builders use a mix of both depending on the specific fixture.
Local fabricators can also apply a blackened or patina finish during fabrication, saving the builder from doing this finishing work themselves after installation. This service typically adds a modest fee but produces a more even, professional-looking finish than a DIY blackening attempt. Asking about this service upfront when sourcing a fabricator is worth the extra conversation.
1. Raw Steel Countertop Edge With A Wood Butcher Block
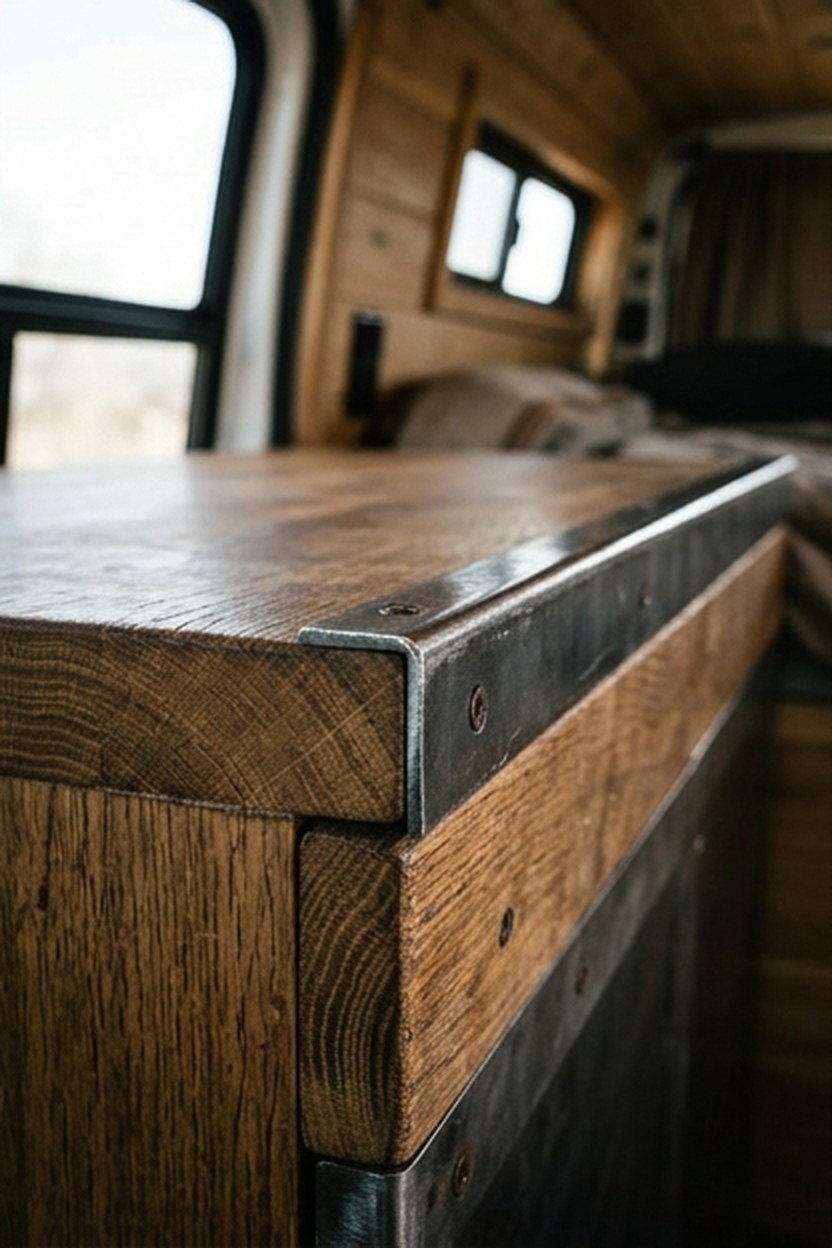
A raw steel edge banding a wood butcher block countertop creates a clean transition between the two materials while protecting the counter’s most vulnerable edge from daily wear and impact. This detail, often overlooked in favor of a simple wood-only edge, is one of the more visually striking ways to introduce steel into a kitchen area without covering the entire surface. The contrast reads as intentional the moment you see it.
Fabricating this edge typically involves a bent steel strip, roughly an eighth of an inch thick, fastened along the counter’s front edge with countersunk screws or an adhesive designed for mixed materials. A local metal shop can bend this strip to the exact counter length, avoiding a seam that would otherwise interrupt the clean line.
Choosing a raw, unsealed steel finish for this edge lets it develop a natural patina over time, which many owners consider part of the appeal rather than a flaw to prevent. A sealed or powder-coated option avoids this patina if a more consistent look is preferred. Either choice works within the industrial aesthetic, so this comes down to personal preference for how the finish ages.
Cost And Fabrication Timing
A custom steel counter edge typically costs $150 to $400 depending on counter length and finish choice, a modest expense relative to its visual impact. Ordering this piece before the butcher block counter is finalized allows the fabricator to work from exact final dimensions rather than guessing at tolerances.
Skipping proper edge protection on a wood counter in a van, where moisture and temperature swings are more extreme than in a house, often leads to premature warping or cracking at the counter’s most exposed edge. The steel banding solves this functional problem while also delivering the aesthetic, making it one of the more efficient dual-purpose choices on this list. This combination of function and style is worth prioritizing early in the build.
2. Blackened Steel Shelf Brackets Along Open Wood Shelving
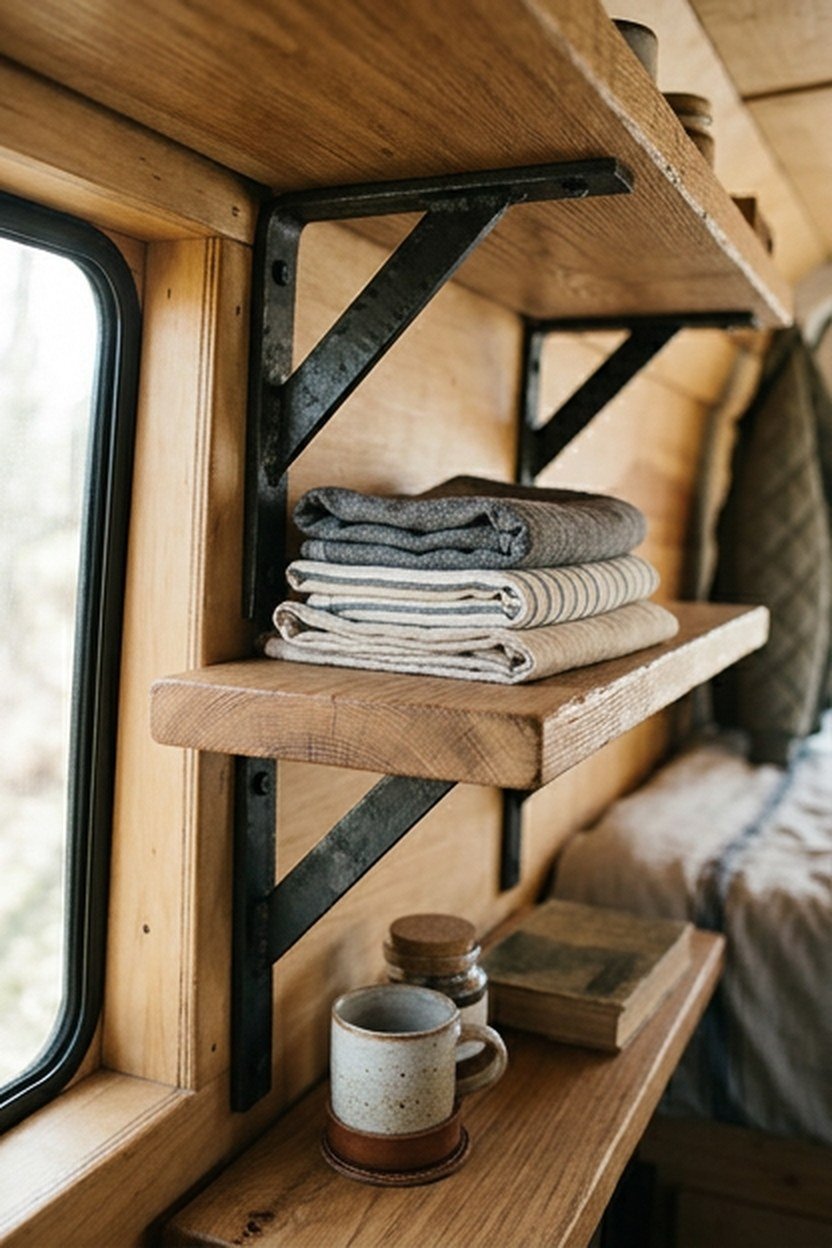
Blackened steel shelf brackets, mounted beneath open wood shelving, anchor the shelving visually while providing genuine structural support for kitchen or storage items that shift during driving. This bracket style reads distinctly industrial compared to a hidden internal bracket system, making the hardware itself part of the design rather than something concealed. Exposed brackets also simplify installation compared to internal blocking hidden inside the shelf itself.
Bracket sizing should match the actual load the shelf will carry, since undersized brackets risk sagging or failure under the vibration and shifting weight typical of van travel. Most fabricators recommend sizing brackets for at least double the expected static load specifically to account for the shifting forces of driving.
Positioning brackets at both ends and, for shelves longer than about two feet, adding a center bracket prevents the sagging that a two-bracket-only setup risks over time. This center support is easy to skip during initial planning but becomes obvious in hindsight once a loaded shelf begins to bow. Planning for this extra bracket from the start avoids a visible flaw in an otherwise clean build.
Cost And Load Considerations
A set of blackened steel shelf brackets typically costs $20 to $60 per bracket depending on size and finish, with a typical van kitchen needing four to six brackets total. Choosing brackets rated for a load well beyond the shelf’s expected weight avoids the sagging problem discussed above without meaningfully increasing cost.
A common mistake is mounting brackets directly into thin van wall paneling without reaching the structural ribs behind it, resulting in brackets that pull loose under load. Locating and mounting into the van’s actual structural ribs, even if it requires slightly repositioning the shelf, is non-negotiable for a bracket system that needs to hold real weight.
3. Exposed Steel Conduit For Interior Wiring Runs
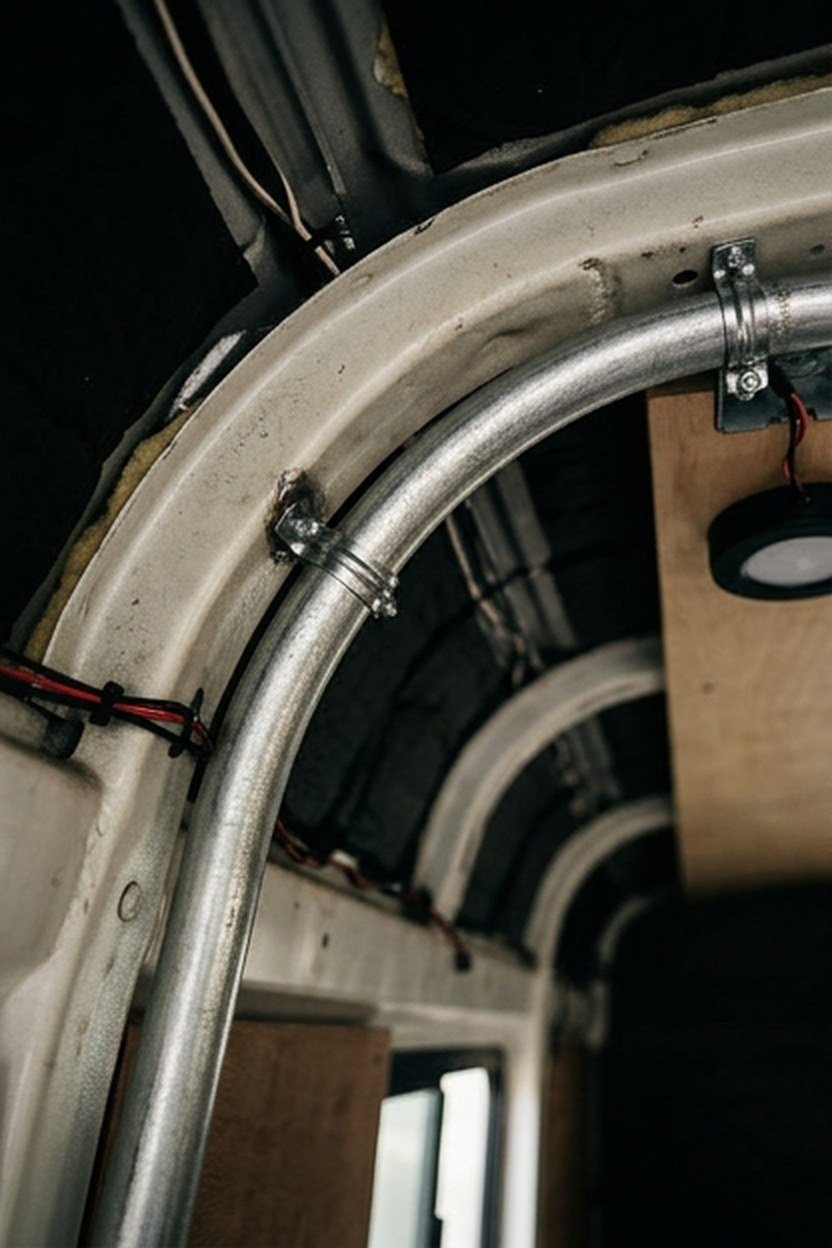
Exposed steel conduit, running visible wiring along the van’s interior walls or ceiling rather than hiding it behind finished panels, is a signature industrial detail borrowed directly from converted warehouse and loft spaces. This approach also simplifies maintenance considerably, since a wiring issue can be traced and accessed without cutting into finished wall panels. The visual and practical benefits reinforce each other in this particular choice.
Routing conduit along clean, deliberate lines, following the van’s structural ribs or ceiling beams, keeps the exposed wiring reading as intentional design rather than a sloppy afterthought. Most builders sketch the conduit path before installing any wall paneling, ensuring the run follows a clean geometric line rather than a meandering path dictated by convenience alone.
Using galvanized or blackened conduit, rather than the cheaper plain steel option, resists the corrosion that van interiors are prone to given regular temperature and humidity swings during travel. This upgrade costs modestly more per foot but avoids visible rust developing within the first year or two of regular use.
Cost And Electrical Code Considerations
Exposed steel conduit for a typical van electrical run costs $3 to $8 per foot depending on diameter and finish, with a full van interior typically needing 20 to 40 feet total. This modest material cost makes exposed conduit one of the more affordable ways to introduce a strong industrial visual element throughout the build. The labor to route and secure it properly adds more to the overall cost than the material itself.
Working with an electrician familiar with mobile and RV-specific code, rather than standard residential code, ensures the exposed conduit run meets safety requirements specific to a moving vehicle’s vibration and temperature range. Skipping this expertise in favor of a purely DIY approach risks both a code violation and a genuine safety issue down the road.
4. Steel Pipe Towel Bar Or Hanging Rail
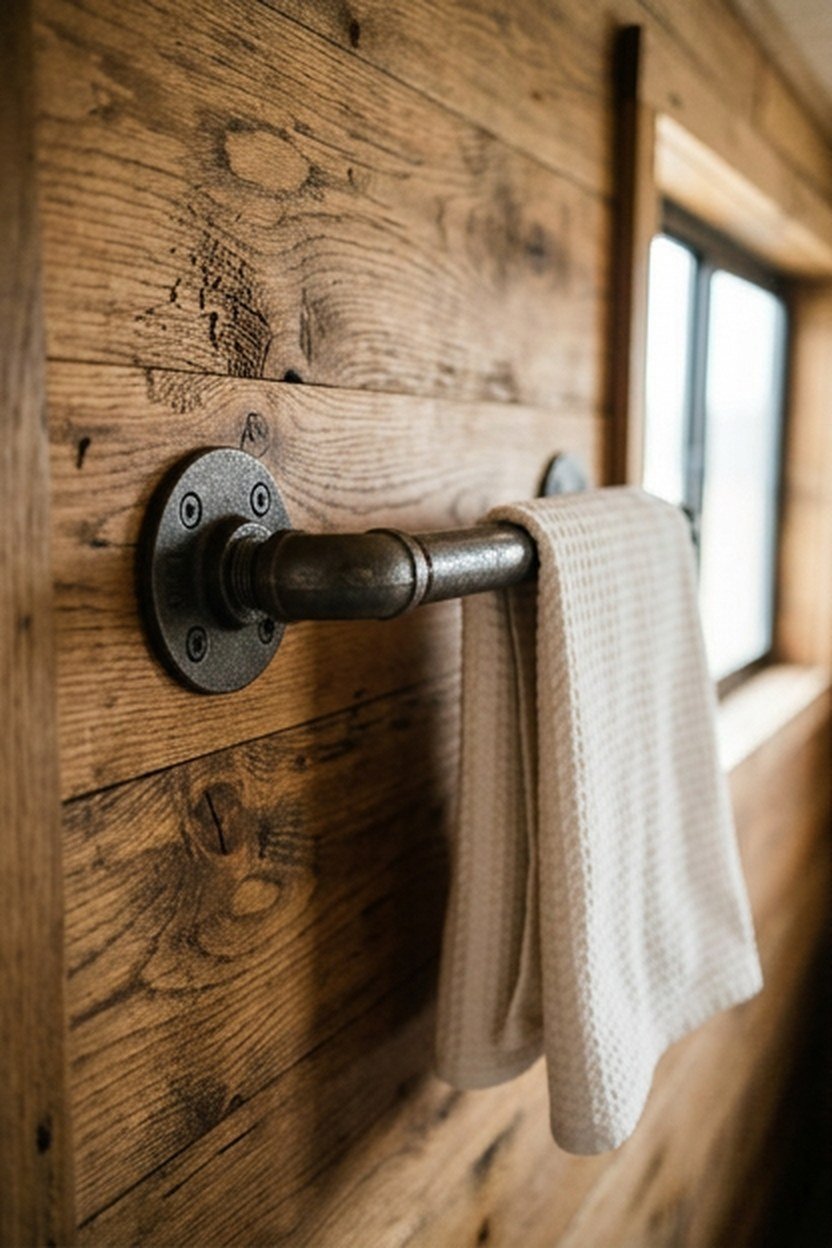
A steel pipe towel bar or hanging rail, fabricated from threaded black pipe fittings, brings an unmistakably industrial detail into a small van bathroom or closet area at minimal cost and weight. This fixture style, popularized originally in loft and warehouse renovations, translates naturally into a van’s compact fixtures given how lightweight standard pipe fittings actually are. The look reads as considerably more expensive than its actual material cost.
Assembling this fixture from standard black pipe fittings, available at most hardware stores, requires no custom fabrication and can be built by most owners in under an hour with basic tools. Choosing threaded flange fittings that mount directly into the van’s structural wall ribs ensures the fixture holds securely despite the vibration typical of van travel.
Sanding and applying a clear matte sealant to the pipe’s natural finish prevents the black paint some pipe fittings ship with from rubbing off onto towels or clothing during regular use. This small finishing step, easy to skip, meaningfully improves the fixture’s day-to-day usability. Taking the extra twenty minutes for this step avoids an annoying maintenance issue later.
Cost And Assembly Guidance
A complete steel pipe towel bar or hanging rail typically costs $25 to $60 in parts, making it one of the most affordable industrial details available for a van interior. Purchasing slightly oversized flange fittings and reinforcing the wall mounting point with a backing plate improves the fixture’s holding strength considerably beyond a standard flange alone.
A common mistake is mounting the fixture into thin paneling without reaching structural framing behind it, exactly the same failure mode as the shelf brackets discussed earlier in this list. Locating structural ribs before drilling any mounting holes prevents this failure and saves a frustrating reinstallation later.
5. Wood Slat Ceiling With Steel Beam Accents
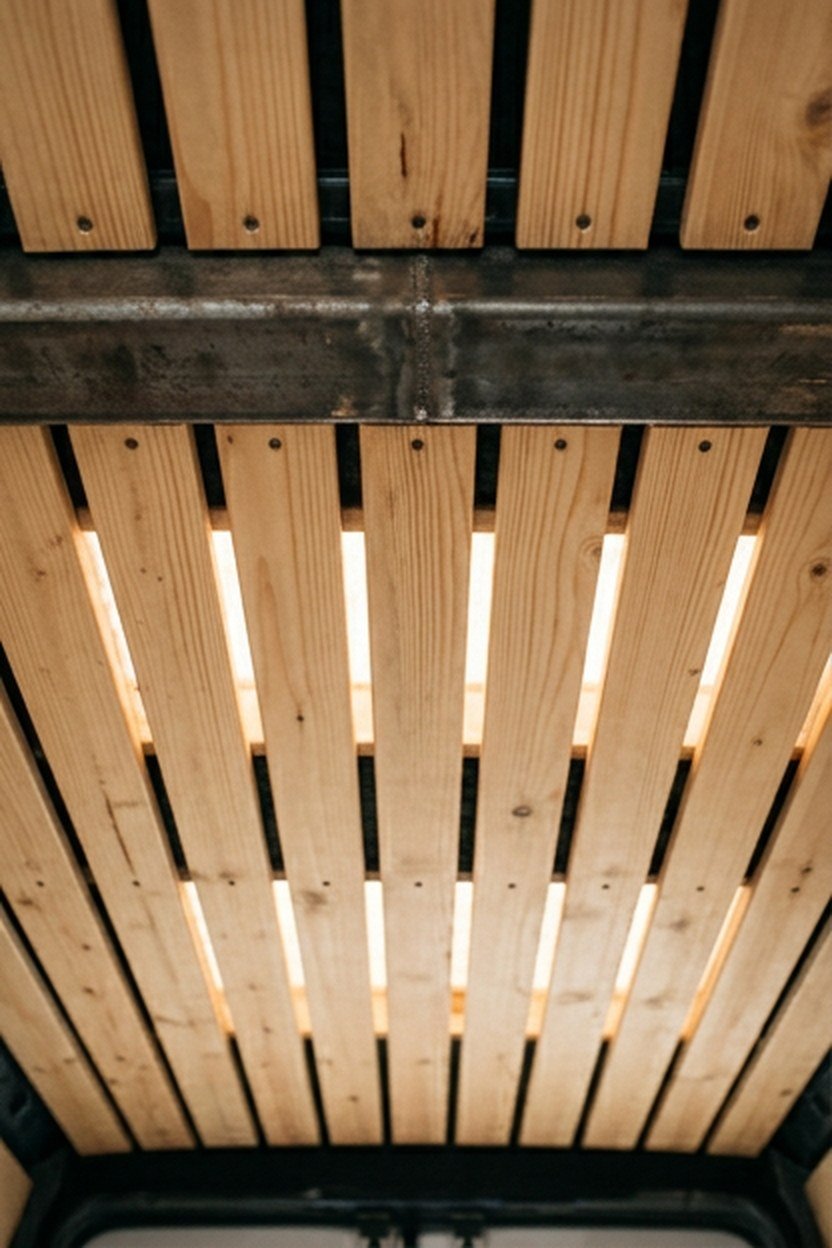
A wood slat ceiling, using thin strips of light-toned wood spaced with small gaps, creates visual texture overhead while keeping the ceiling considerably lighter than a solid wood panel would be. Adding a steel beam accent, either structural or purely decorative, running perpendicular to the slats introduces the industrial contrast this entire aesthetic depends on. The combination reads as considerably more finished than either material used alone.
Spacing the wood slats consistently, typically with a small gap of a quarter inch or so between each strip, creates a rhythm that reads as intentional rather than randomly assembled. This spacing also allows any wiring or insulation behind the slats to remain slightly visible through the gaps, reinforcing the exposed, industrial character of the overall design. Consistency in this spacing is what makes the ceiling read as considered rather than improvised.
The steel beam accent, if purely decorative rather than structural, should still be substantial enough in appearance to read as a genuine architectural element rather than a thin decorative strip. Most builders use a steel channel or tube with real presence, roughly two to three inches in profile, to achieve this effect convincingly. A too-thin accent piece undermines the intended visual weight this detail is meant to provide.
Cost And Weight Considerations
A wood slat ceiling with a steel beam accent typically costs $500 to $1,200 for materials across a standard van length, with the steel beam representing a modest portion of that total. Choosing a hollow steel tube rather than solid steel for the beam accent keeps the weight addition minimal while still delivering the same visual presence. This hollow-tube choice is worth specifying explicitly when sourcing the material.
Overloading the ceiling with too much wood slatting can add unnecessary weight to a build where every pound affects fuel economy and payload capacity. Using a thinner slat profile, around three-eighths of an inch, rather than a thicker board keeps the ceiling’s total weight reasonable while still delivering the desired visual texture.
6. Raw Steel Stove Surround And Backsplash
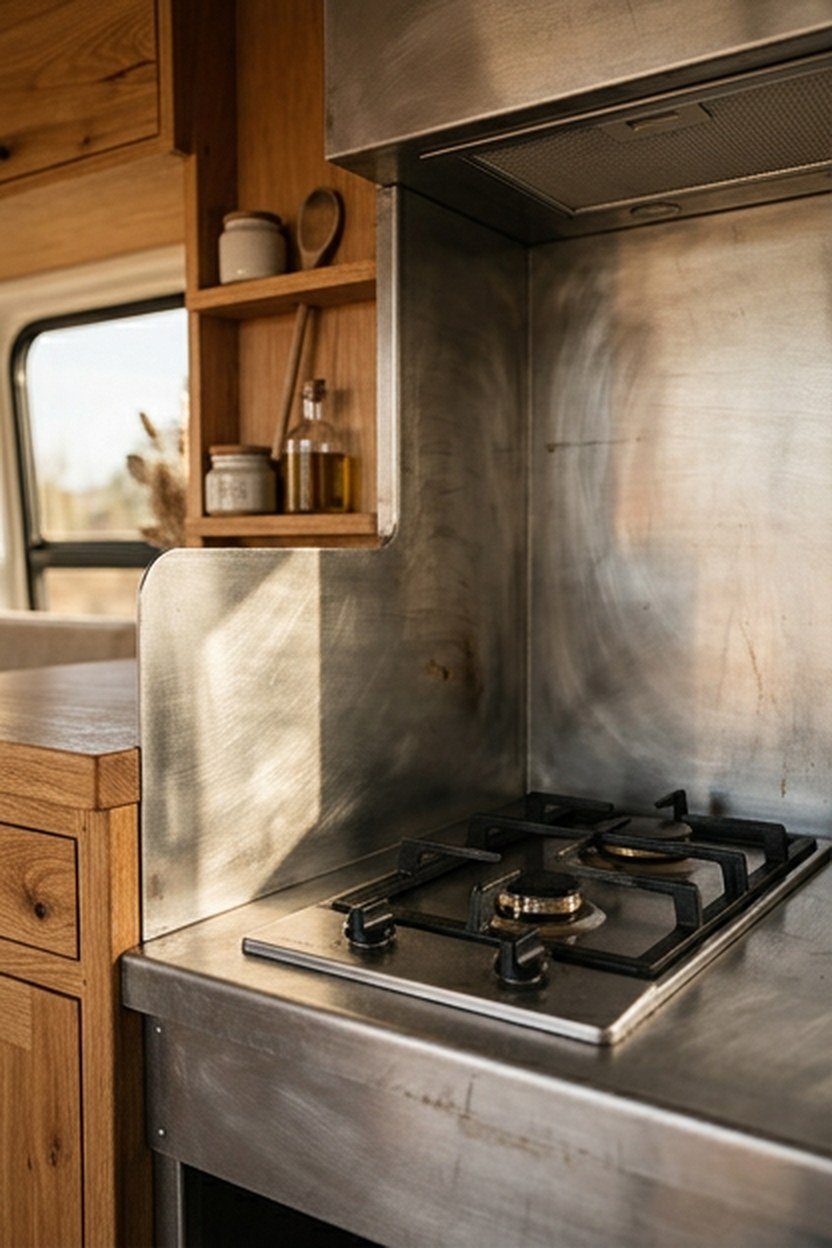
A raw steel stove surround and backsplash protects the surrounding wood cabinetry from heat and grease splatter while introducing one of the most functionally justified steel accents in the entire build. This fixture typically covers the wall area directly behind and beside the cooktop, an area that genuinely needs heat-resistant material regardless of the aesthetic chosen. The industrial look here comes as a natural byproduct of a purely practical requirement.
Fabricating this surround from a single bent sheet of steel, rather than multiple pieced-together panels, produces a cleaner look with fewer seams for grease and moisture to collect in over time. A local fabricator can bend a single sheet to wrap the corner behind a typical van cooktop installation, avoiding the seam a two-piece design would require. This single-piece approach costs modestly more but simplifies both the look and the cleaning routine.
Choosing a brushed rather than mirror-polished steel finish for this surround hides fingerprints and minor scratches far better during daily cooking use. A mirror finish looks striking in photos but shows every smudge within a day of regular cooking, making it a less practical choice for this specific application.
Cost And Heat Safety Considerations
A custom raw steel stove surround typically costs $200 to $500 depending on size and finish, a reasonable cost given the fire safety benefit it also provides. Confirming the steel gauge and mounting method meet the heat clearance requirements specified by your specific cooktop model avoids a safety issue disguised as a purely aesthetic choice.
Mounting the steel surround with a small air gap behind it, rather than directly against the wood cabinetry, improves heat dissipation and further protects the wood from scorching over years of regular cooking. This air gap, typically a quarter inch or so, is a small detail easy to specify to a fabricator but easy to miss if not explicitly requested. Confirming this detail during fabrication planning avoids a preventable heat safety issue.
7. Wire Cage Pendant Light Over A Work Surface
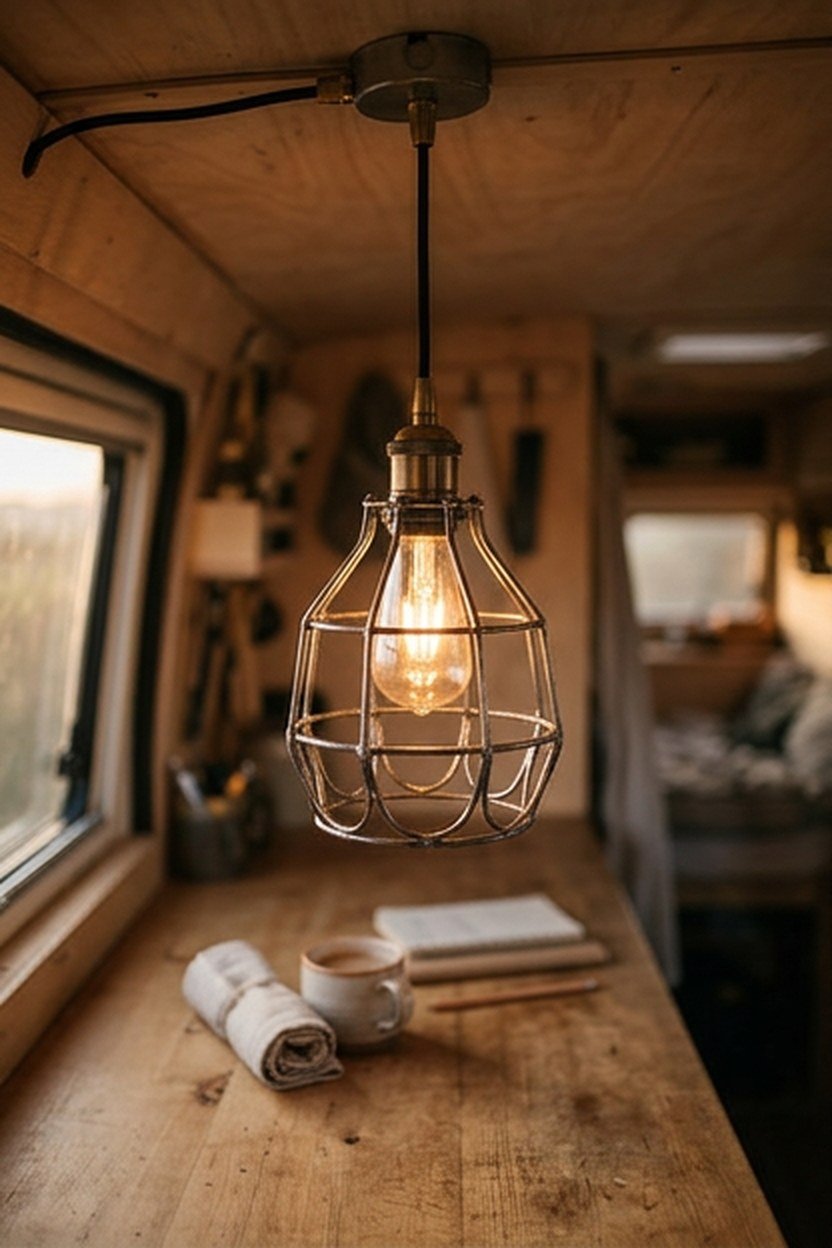
A wire cage pendant light, typically an exposed bulb enclosed in a simple steel wire cage, brings a distinctly industrial lighting element into a van’s kitchen or workspace area without the bulk of a larger fixture. This fixture style, borrowed from warehouse and workshop lighting, suits the compact scale of a van interior particularly well. The exposed bulb and cage combination reads as intentional rather than incomplete.
Choosing a warm-toned LED bulb for this fixture, rather than a cooler white light, keeps the overall van interior feeling inviting despite the fixture’s industrial styling. This warm-cool contrast between the fixture’s steel cage and its warm bulb tone mirrors the same balance this entire aesthetic depends on elsewhere in the build. Getting this bulb tone right meaningfully affects how the whole space feels in the evening.
Mounting this pendant on a short cord or rigid rod, rather than a long hanging cord, keeps the fixture stable during driving and avoids the swinging motion a longer cord would create on rough roads. Most van-specific lighting suppliers offer a rigid-mount version of this fixture specifically designed for mobile use. Choosing this mobile-specific version over a standard residential fixture avoids a fixture that swings and rattles during travel.
Cost And Mounting Guidance
A wire cage pendant light suited for van use typically costs $30 to $90 depending on size and cage material quality. Choosing a fixture with a secure rigid mount, rather than adapting a standard residential hanging fixture, avoids the swinging and potential damage that unsecured lighting risks during travel. This van-specific sourcing consideration is worth the modest research time it takes to find the right fixture.
A common mistake is mounting this fixture too low over a work surface, where the exposed bulb and cage create a head-bump hazard in a van’s already limited headroom. Testing the mounting height against actual headroom clearance before finalizing the installation avoids this frustrating and entirely preventable mistake. This test takes only a few minutes but saves a repeated bruised head for months afterward.
8. Distressed Leather And Steel Seating Accents
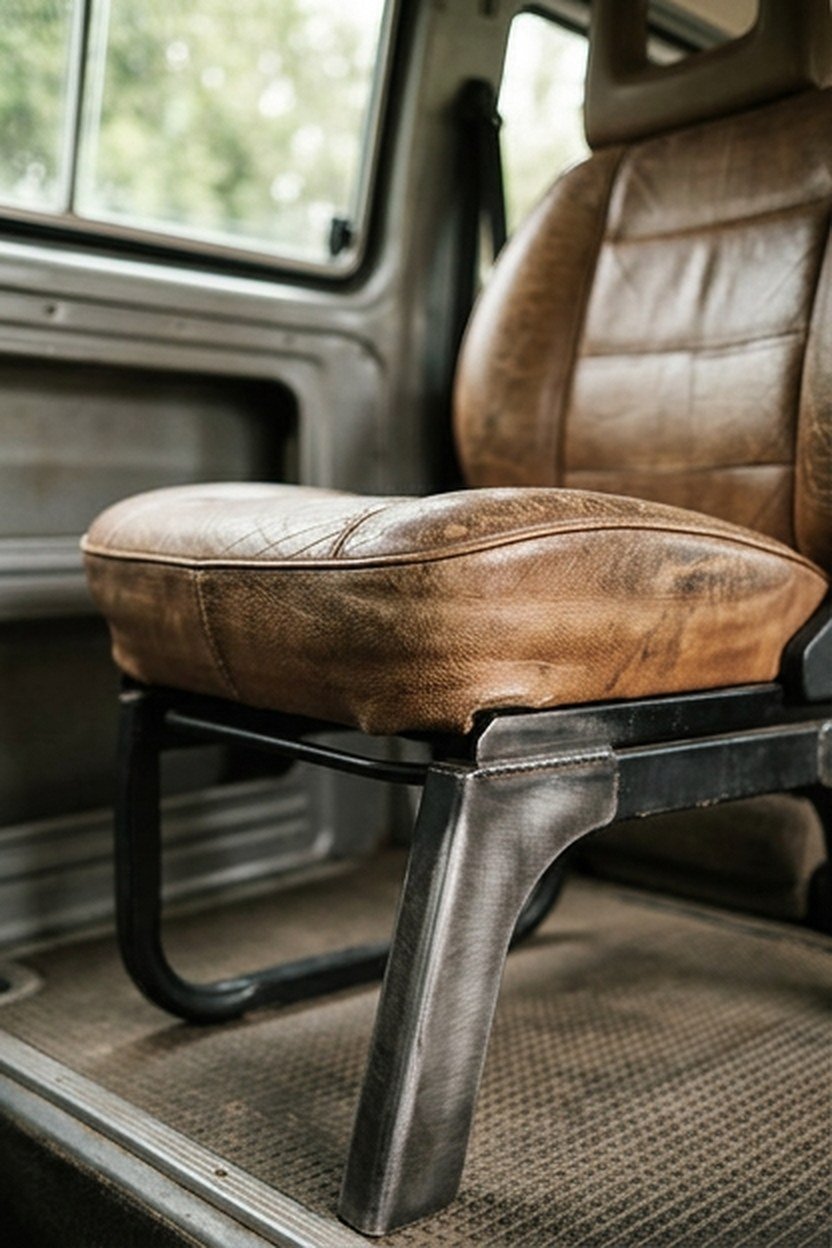
Distressed leather cushions or seat covers, paired with steel-framed seating hardware, extend the industrial aesthetic into the van’s seating area without requiring a full custom upholstery job. This combination brings warmth back into a fixture, seating, that would otherwise read as cold if built entirely from steel and vinyl. The leather’s natural texture variation also hides the wear and marking that van travel inevitably brings.
Choosing a genuine or high-quality faux leather in a rich brown or tan tone complements the wood tones used elsewhere in the build far better than a black or gray leather option would. This color coordination between the seating and the surrounding wood cabinetry keeps the overall palette from feeling disjointed. Most builders test a small leather sample against their actual wood tone before committing to a full seating order.
Steel seating frames, whether custom fabricated or sourced from a van-specific supplier, should prioritize genuine structural rigidity over purely decorative steel tubing, since seating experiences real force during both regular use and vehicle motion. A frame that flexes noticeably under normal use signals undersized steel that will likely fail over time.
Cost And Sourcing Guidance
Distressed leather seating accents for a van interior typically cost $300 to $900 depending on whether custom upholstery or pre-made covers are chosen. Sourcing steel seating frames from a supplier specifically experienced with vehicle seating, rather than general furniture fabrication, ensures the frame meets the safety standards a moving vehicle requires.
A common mistake is choosing a leather or leather-look material that looks striking in photos but proves impractical for actual daily van living, particularly in humid climates where certain leather finishes can develop mildew. Choosing a treated, moisture-resistant leather specifically suited for mobile or marine use avoids this problem before it starts.
9. Steel Cable Railing For A Lofted Bed Platform
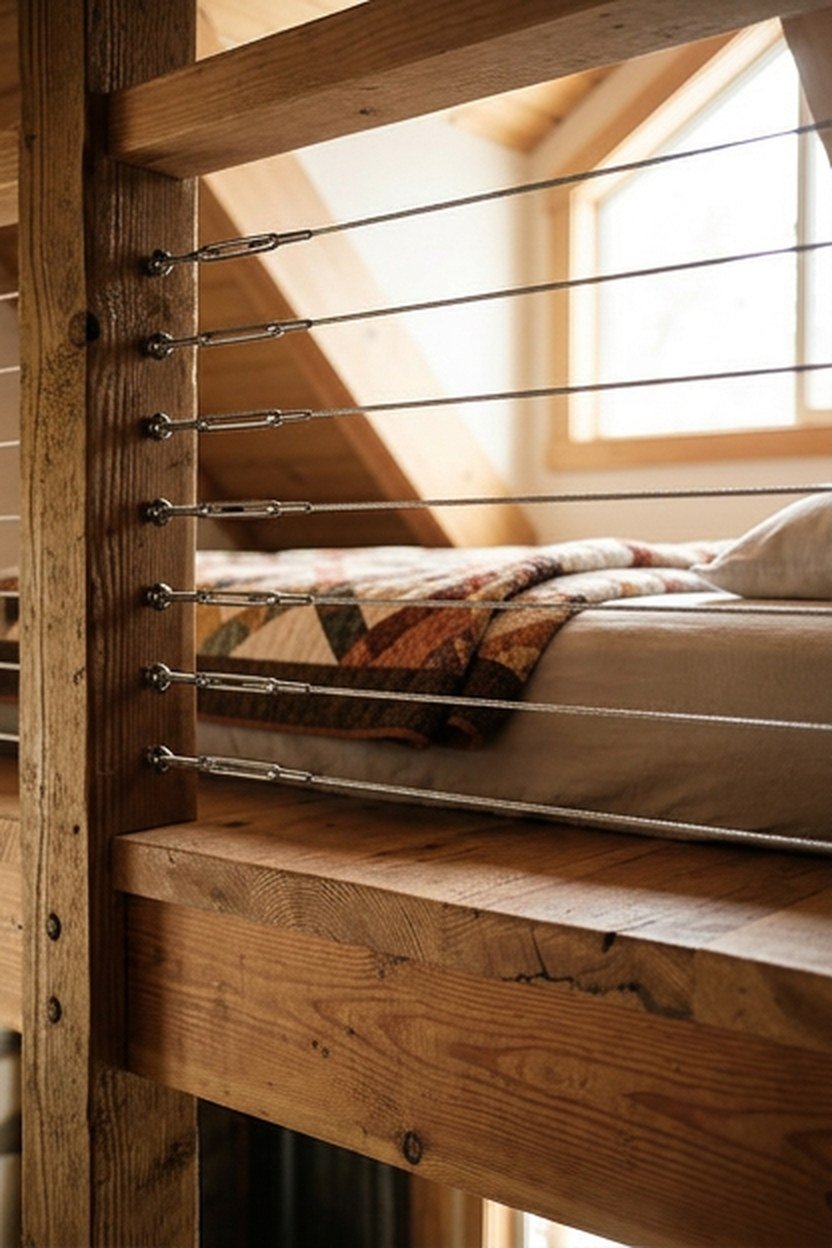
Steel cable railing, strung taut between steel posts, provides a safety barrier along a lofted bed platform edge while maintaining an open, unobstructed sightline that a solid wood rail would block. This detail suits van builds specifically because it delivers genuine fall protection without adding the visual bulk or weight a solid railing panel would require. The cable’s thin profile also lets light pass through the loft area more freely.
Tensioning the cable properly during installation matters considerably for both safety and appearance, since a loose cable both fails to provide adequate fall protection and looks visibly sloppy compared to a properly tensioned run. Most fabricators recommend a cable tensioning kit specifically designed for railing applications, rather than simply pulling the cable tight by hand during installation.
Spacing the cable runs closely enough to meet standard safety guidelines, typically no more than four inches between horizontal runs, matters especially in a van used by families with small children. This spacing consideration should be confirmed against relevant safety standards before finalizing the railing design. Getting this spacing right the first time avoids a safety retrofit later.
Cost And Safety Guidance
A steel cable railing system for a lofted bed platform typically costs $150 to $400 depending on run length and the number of posts required. Purchasing a complete cable railing kit, rather than sourcing individual components separately, simplifies installation and ensures all hardware is rated for the same load capacity.
Skipping proper post anchoring into the van’s structural framing, instead mounting posts into thin paneling alone, risks a catastrophic railing failure under real fall force. This is not an area where cutting corners on structural mounting is acceptable, given the genuine safety consequences of a failure. Confirming structural anchoring before considering this feature complete is a non-negotiable step.
10. Reclaimed Wood Accent Wall With Steel Trim
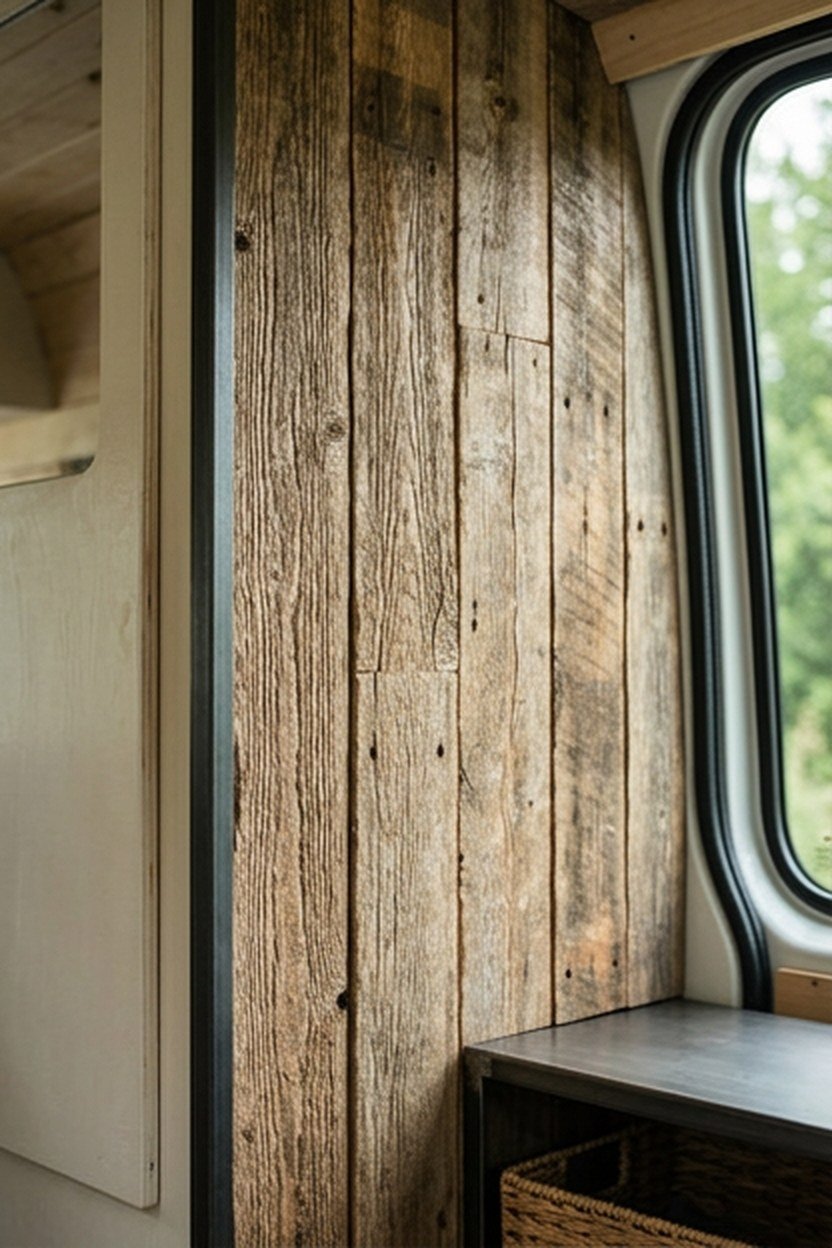
A reclaimed wood accent wall, using salvaged barn wood or pallet wood with visible weathering and character, introduces genuine warmth and history into a van interior that would otherwise feel entirely new and uniform. Trimming this accent wall’s edges with a thin steel strip creates a clean, deliberate boundary that keeps the reclaimed wood from reading as haphazard or unfinished.
Sourcing reclaimed wood specifically treated and kiln-dried for interior use, rather than untreated salvage wood, avoids introducing pests or excess moisture into a van’s tightly sealed interior environment. This treatment step is non-negotiable given how much damage an untreated pest infestation could cause inside a small, enclosed vehicle. Confirming this treatment with your wood supplier before purchase is worth the extra question.
Planning the accent wall’s placement on a single, clearly defined wall section, rather than scattering reclaimed wood pieces throughout the build, keeps the look intentional rather than randomly assembled. Most successful builds limit this material to one clear feature wall, letting the rest of the interior use cleaner, more uniform wood surfaces.
Cost And Sourcing Considerations
Reclaimed wood for an accent wall typically costs $4 to $10 per square foot depending on source and condition, with steel trim adding a modest additional cost for material and fabrication. Sourcing from a supplier who specifically treats and kiln-dries reclaimed wood for interior use, rather than a general salvage yard, costs somewhat more but avoids the pest and moisture risks discussed above.
A common mistake is using reclaimed wood pieces of significantly varying thickness on the same wall, creating an uneven surface that complicates trim installation and looks unintentionally sloppy rather than intentionally rustic. Sorting and selecting pieces of consistent thickness before installation, even if it means discarding some otherwise attractive pieces, produces a noticeably cleaner final result.
11. Steel Grate Flooring Accent Near The Entry
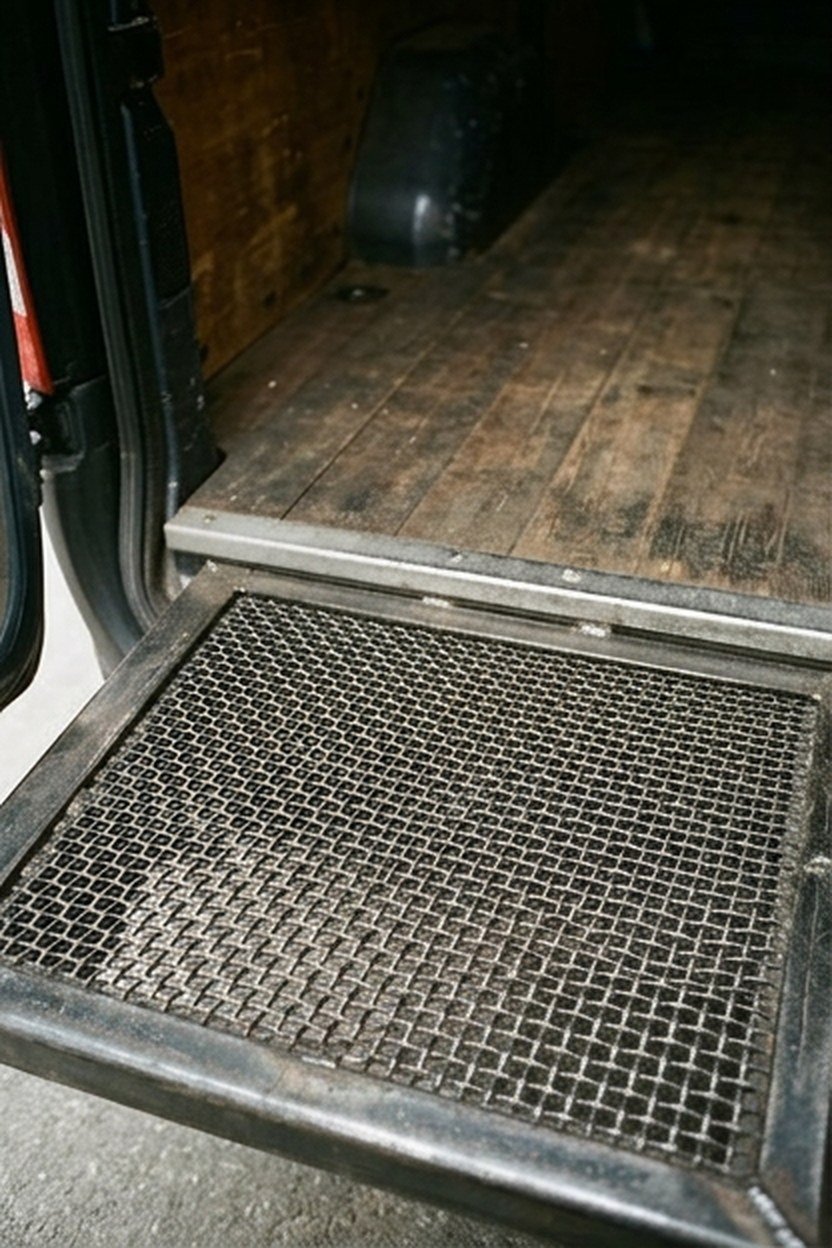
A small section of steel grate flooring, typically installed just inside the van’s entry door, provides a durable, easy-to-clean transition zone that handles mud, snow, and debris tracked in from outside without damaging the wood flooring beyond it. This detail also introduces a distinctly industrial texture underfoot right at the point of entry, setting the tone for the aesthetic throughout the rest of the build. The functional benefit here justifies the steel choice as much as the visual one.
Sizing this grate section to match the actual footprint of the entry area, rather than extending it further than necessary, keeps the industrial accent contained to a logical zone rather than spreading across the entire floor. Most builds limit this feature to a strip roughly two to three feet deep just inside the door.
Choosing a grate with a fine enough mesh to prevent small items, like keys or coins, from falling through into the space beneath avoids an annoying and recurring frustration for the van’s occupants. Most suppliers offer several mesh density options specifically for this reason. Selecting a finer mesh costs marginally more but avoids this everyday annoyance entirely.
Cost And Installation Guidance
A steel grate flooring section for a van entry typically costs $80 to $200 depending on size and mesh density, a modest expense relative to the durability benefit it delivers. Installing this section with a slightly recessed frame, so the grate sits flush with the surrounding wood floor rather than raised above it, avoids a tripping hazard at the entry point.
A common mistake is failing to plan drainage beneath the grate, resulting in water and mud simply pooling in the space below rather than draining away as intended. Installing a small drainage channel or removable collection tray beneath the grate solves this problem and simplifies the cleaning routine considerably.
12. Blackened Steel Cabinet Hardware And Pulls
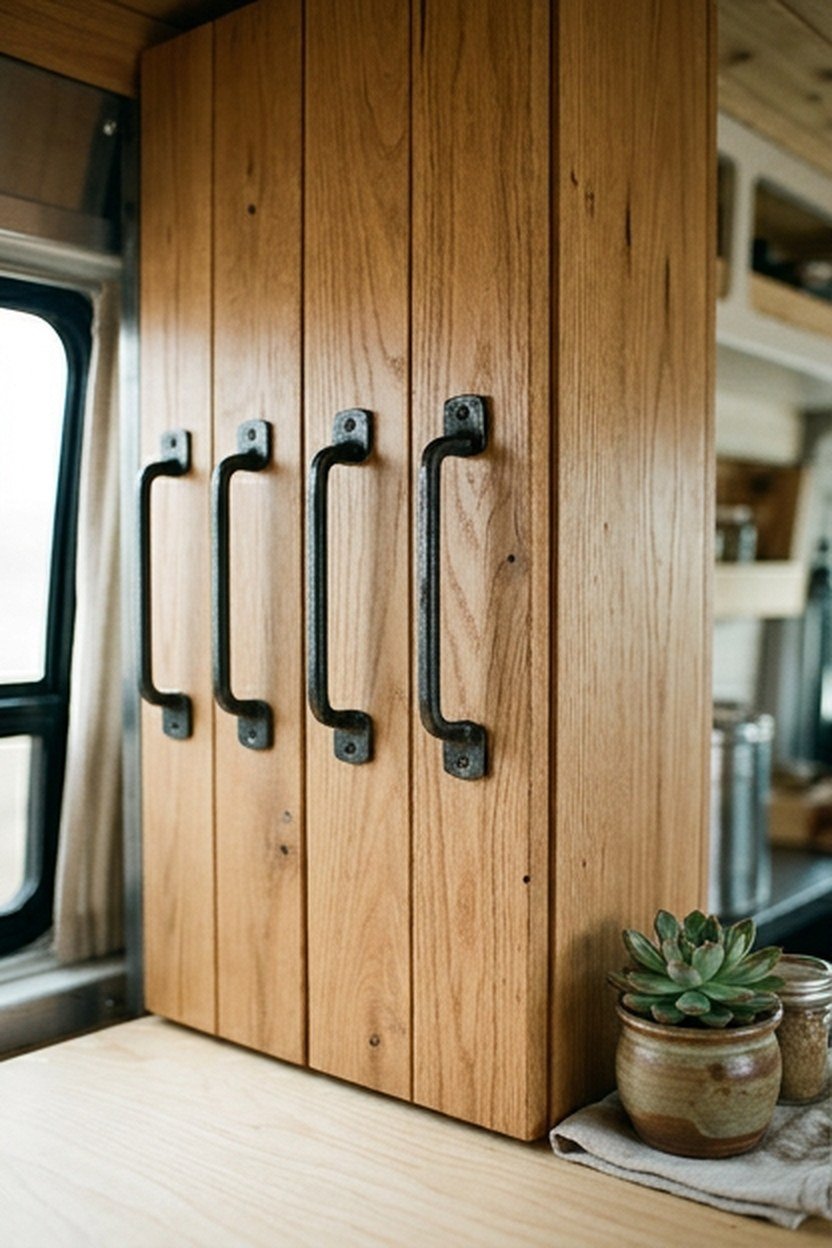
Blackened steel cabinet hardware and pulls, replacing standard chrome or brass options, is one of the simplest and most affordable ways to reinforce the industrial aesthetic across an entire van’s cabinetry at once. This swap requires no structural changes to the cabinets themselves, making it an easy upgrade even for a build that started with a different hardware finish originally. The visual impact relative to the cost involved makes this one of the more efficient choices on this entire list.
Choosing a consistent hardware style and finish across every cabinet in the van, rather than mixing several different pull designs, keeps the overall look cohesive rather than visually busy. Most builders standardize on a single simple bar pull or knob style throughout, varying only the size slightly between larger and smaller cabinet doors.
Testing hardware placement height and position on a single cabinet before installing it across the entire van avoids a costly and time-consuming reinstallation if the initial placement proves uncomfortable in daily use. This test-first approach is worth the extra planning step given how many individual pulls a typical van interior requires. A single test installation takes minutes but can save hours of rework later.
Cost And Sourcing Guidance
Blackened steel cabinet hardware typically costs $3 to $12 per pull depending on style and size, with a typical van interior needing 10 to 20 pulls total across all cabinetry. This modest total cost makes hardware one of the most budget-friendly ways to reinforce the industrial aesthetic throughout the entire build. Ordering a few extra pulls beyond the exact count needed accounts for any installation mistakes or future replacements.
A common mistake is choosing hardware that looks appropriately industrial in isolation but clashes with other metal finishes already used elsewhere in the build, like a stove surround or shelf brackets finished in a different steel tone. Confirming that all steel finishes throughout the van match or intentionally complement each other avoids this inconsistency.
13. Steel Mesh Cabinet Door Inserts
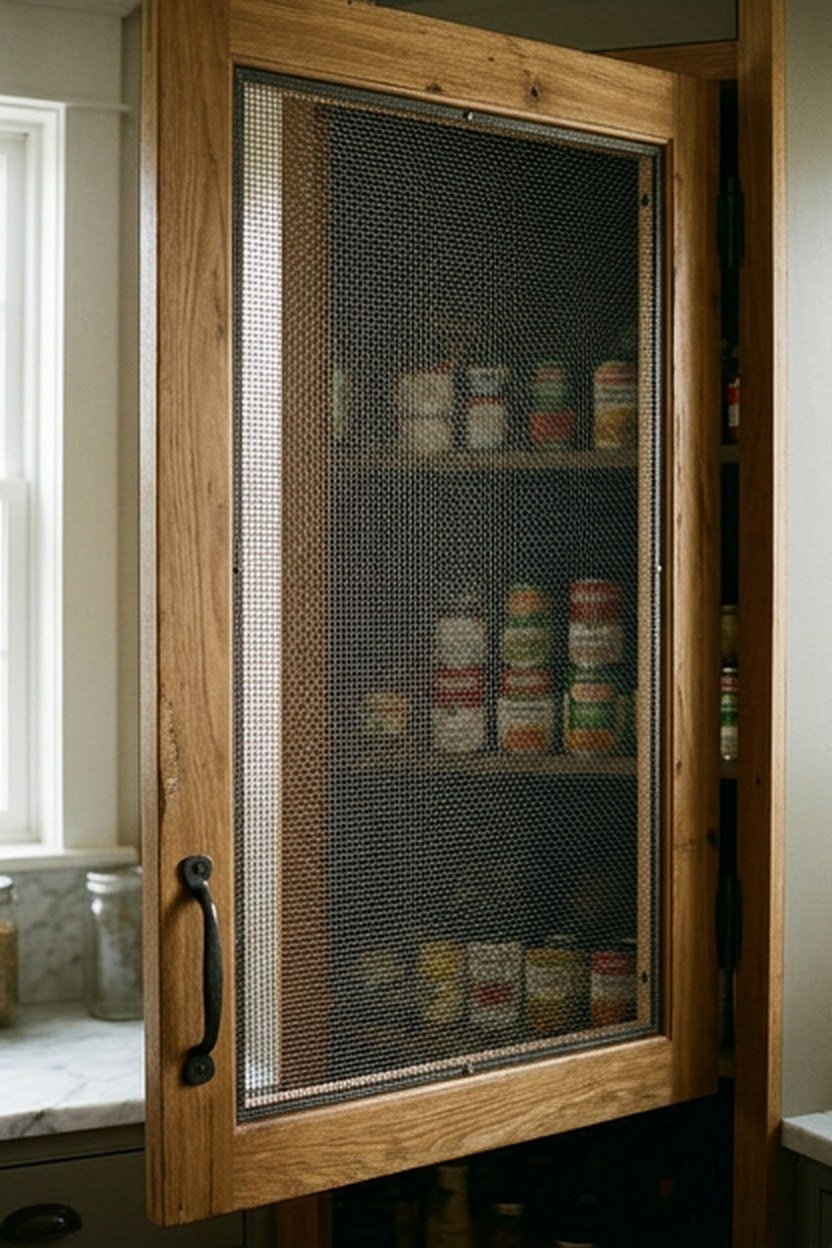
Steel mesh inserts, set into cabinet door frames in place of solid wood panels, introduce visual texture and allow light and airflow into cabinet interiors while still providing genuine closure and protection for stored items. This detail works particularly well on pantry or dry storage cabinets, where ventilation actually benefits the stored contents. The industrial texture this insert provides is a genuine functional upgrade, not purely decorative.
Fabricating or sourcing a mesh insert sized precisely to fit within an existing cabinet door frame requires accurate measurement of the frame’s interior opening before ordering. Most suppliers offer standard mesh panel sizes that can be trimmed to fit, simplifying this process considerably compared to a fully custom order. This standard-size approach saves both cost and lead time compared to a bespoke fabrication.
Choosing a mesh density fine enough to keep smaller stored items from shifting through the openings, while still coarse enough to provide genuine visual texture and airflow, requires balancing these two competing goals. Most builders find a middle-density mesh option satisfies both requirements adequately for typical pantry storage. Testing a sample against your actual stored items before finalizing the order avoids a mismatch discovered only after installation.
Cost And Fabrication Guidance
Steel mesh cabinet door inserts typically cost $15 to $40 per door depending on size and mesh density, a modest cost for the ventilation and visual benefit provided. Ordering slightly oversized mesh panels and trimming them to the exact frame size during installation gives more flexibility than ordering an exact-size panel that might not fit precisely.
A common mistake is installing mesh inserts on cabinets storing items that genuinely need to stay hidden or dust-free, undermining the storage function these particular cabinets are meant to serve. Reserving mesh inserts specifically for cabinets where visible, ventilated storage genuinely makes sense, and using solid wood panels elsewhere, keeps the choice functional rather than purely aesthetic.
14. Steel Strap Hinges On Cabinet Doors
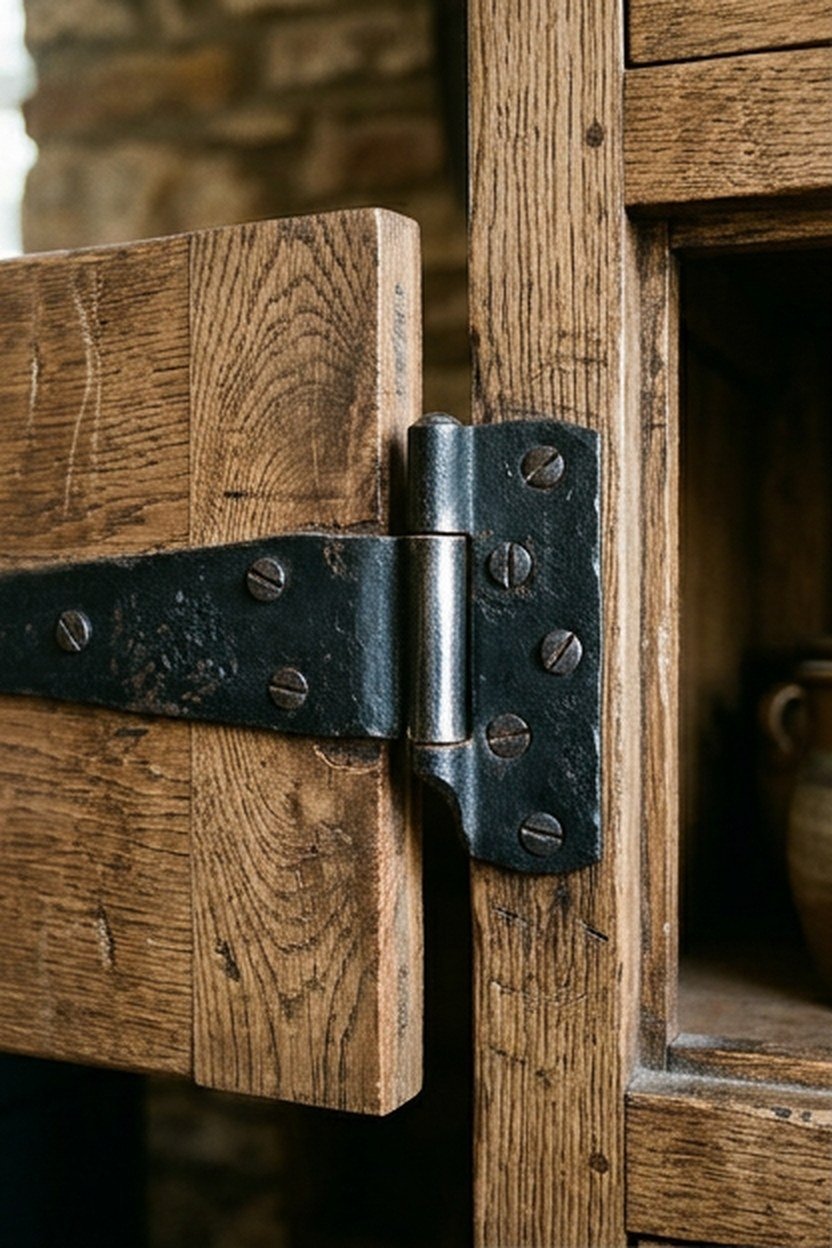
Steel strap hinges, a style borrowed directly from barn door and industrial furniture construction, replace standard concealed cabinet hinges with a visible, decorative hardware element that reinforces the aesthetic every time a cabinet door opens. This hinge style also tends to be considerably more robust than a typical concealed hinge, an advantage given the repeated stress cabinet doors experience during van travel. The visible hardware becomes part of the design rather than something hidden away.
Sizing the strap hinge to match the cabinet door’s actual scale matters for both appearance and function, since an oversized hinge on a small door looks disproportionate while an undersized hinge on a larger door may not provide adequate support. Most suppliers offer several strap hinge sizes specifically for this reason, and testing proportions against an actual door before ordering the full set avoids a mismatch.
Choosing a blackened or raw steel finish for these hinges, rather than a bright chrome or brass option, keeps them consistent with the other steel accents used throughout the van’s build. This finish consistency, discussed earlier regarding cabinet pulls, applies equally to hinges and any other visible hardware throughout the interior. Coordinating all these finishes together is what makes the whole build read as a considered aesthetic rather than a collection of mismatched parts.
Cost And Durability Guidance
Steel strap hinges typically cost $8 to $25 per hinge depending on size and finish, with most cabinet doors needing two hinges each. This modest per-door cost makes strap hinges an affordable way to reinforce the industrial look while also gaining a genuinely more durable hinge mechanism than many standard concealed options provide.
A common mistake is choosing a decorative strap hinge not actually rated for the repeated stress of daily cabinet use, resulting in a hinge that loosens or fails within the first year of regular van living. Confirming the hinge’s weight and cycle rating with the supplier before ordering avoids this frustrating and entirely preventable failure.
15. Exposed Steel Roof Rib Accent Panels
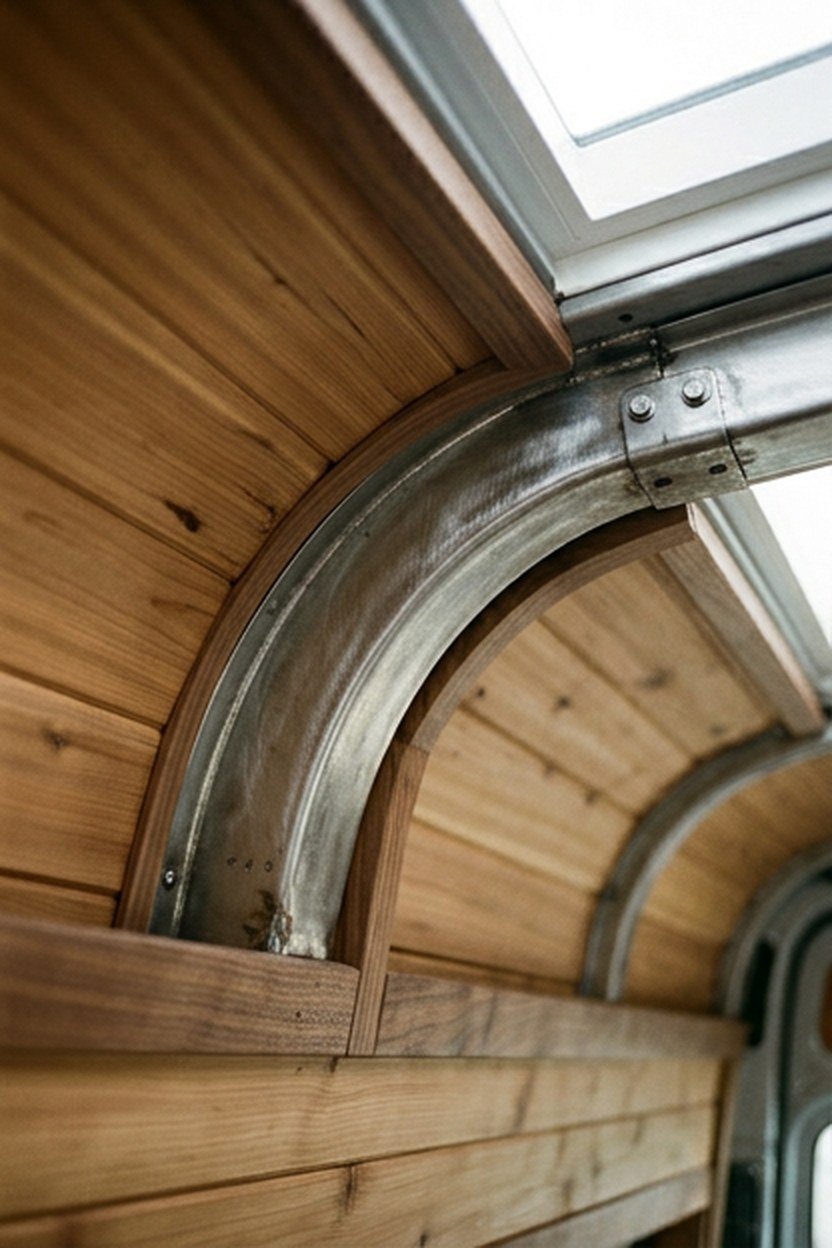
Leaving a section of the van’s structural steel roof ribs intentionally exposed, rather than fully covering them with insulation and paneling, creates a striking industrial ceiling detail that showcases the vehicle’s original structure. This approach works best in a specific accent zone rather than throughout the entire ceiling, since fully exposed ribs elsewhere would compromise insulation and interior temperature control. A single accent section balances the aesthetic against genuine livability.
Treating the exposed steel ribs with a rust-inhibiting primer and a matte clear coat protects the metal from the condensation and temperature swings a van’s interior regularly experiences. This treatment step matters specifically because these ribs remain part of the van’s structural integrity, not merely a decorative element that can be replaced if it degrades. Skipping this treatment risks genuine structural corrosion over time, not just a cosmetic issue.
Framing the exposed rib section with a clean wood or steel trim boundary keeps the feature reading as an intentional accent rather than an area where insulation was simply skipped or forgotten. This framing detail is what communicates to anyone viewing the space that the exposed structure was a deliberate design choice. Without this framing, the same feature can easily read as an incomplete build instead.
Cost And Insulation Trade-Offs
Treating and finishing an exposed steel rib accent section typically costs $100 to $300 depending on the section’s size and the primer and coating products used. This modest cost reflects that the main expense here is careful surface preparation and finishing rather than any significant material purchase. Budgeting time as much as money for this feature is important, since proper surface prep takes real care to execute well.
The genuine trade-off with this feature is a small loss of insulation in the exposed zone, which can create a noticeable cold spot in very cold climates during winter travel. Limiting the exposed section’s size and ensuring the surrounding insulation remains fully intact elsewhere manages this trade-off reasonably well for most climates. Owners planning extensive cold-weather travel should weigh this trade-off carefully before committing to a large exposed section.
What An Industrial Chic Van Interior Actually Costs
A complete industrial chic van interior build, incorporating several of the steel and wood details above, typically adds $3,000 to $8,000 to a standard van conversion budget beyond what an all-wood interior alone would cost. Custom steel fabrication represents the largest portion of this additional cost, with hardware and smaller accents adding a more modest amount. Understanding this rough breakdown helps prioritize which steel details deliver the most visual impact per dollar spent.
Weight remains the other major consideration throughout this entire build, since a van’s payload capacity is finite and every steel accent competes with water tanks, batteries, and other functional systems for that same weight budget. Prioritizing steel accents in high-visibility areas, like the stove surround and cabinet hardware, over less visible structural applications keeps the aesthetic impact high relative to the weight added.
| Feature Category | Typical Added Cost | Typical Added Weight |
|---|---|---|
| Steel hardware and trim | $200 to $600 | Under 5 pounds |
| Custom fabricated accents | $1,500 to $4,000 | 10 to 30 pounds |
| Structural steel elements | $2,000 to $5,000 | 30 to 60 pounds |
Phasing the steel accent installation across the build timeline, starting with hardware and small trim pieces and adding larger fabricated elements as budget allows, lets owners spread this additional cost over a longer period. This phased approach also allows the aesthetic to be refined gradually based on how earlier accents actually look once installed. Many experienced builders recommend this phased strategy specifically for the steel and wood aesthetic given how much visual feedback comes from seeing the first few accents in place.
Common Mistakes That Undermine An Industrial Chic Van Build
The most common mistake is using too much steel relative to wood, tipping the balance so far toward metal that the interior starts to feel cold and uninviting rather than warmly industrial. Steel should remain the accent throughout this build, not the primary material, with wood carrying the majority of the visual weight in cabinetry, ceiling, and flooring.
A second frequent mistake is failing to account for the weight steel accents add to a vehicle where payload capacity is genuinely limited, resulting in a van that handles poorly or exceeds its legal weight rating once loaded. Weighing the van at each major build stage, rather than only estimating weight on paper, catches this problem before it becomes a real safety issue.
Recovering From These Setbacks
Recovering from an overly cold, too-metal interior typically means selectively removing or replacing some steel elements with wood or leather alternatives, prioritizing the largest, most visually dominant pieces first for the biggest impact. This correction is more involved than simply adding warmth through textiles or lighting alone, though those smaller changes can help in the interim while a larger fix is planned. Identifying which specific steel element tipped the balance is worth doing before removing anything.
Recovering from an overweight build usually requires an honest audit of every steel component’s actual necessity, removing purely decorative pieces first before considering any functional element that genuinely earns its weight. This audit process is uncomfortable but necessary, since driving an overweight vehicle carries real legal and safety consequences beyond simply looking less polished. Addressing this before the van goes on the road, rather than after, is the only responsible order of operations.
Conclusion
An industrial chic van interior succeeds by using steel as a deliberate accent against a foundation of warm wood, keeping the balance tipped toward livability. The fifteen concepts here, from a raw steel counter edge to exposed roof rib accents, each deliver a piece of this aesthetic while respecting the real weight limits a van build imposes. Prioritizing function alongside style in every steel choice gives the most reliable path to a build that looks considered and works on the road.
Whether you are planning a full custom conversion or upgrading an existing van one detail at a time, the underlying principles stay consistent: let wood carry the visual weight, use steel selectively where it earns its place, and never lose sight of the actual weight budget a moving vehicle imposes. These fundamentals matter more than any single decorative choice on this list. Get them right, and the individual steel accents become the enjoyable finishing touches on an already sound build.
Frequently Asked Questions
What is industrial chic style in a van conversion? Industrial chic pairs raw or blackened steel accents, like brackets, trim, and hardware, with warm wood surfaces for structure and cabinetry. The contrast between cold metal and warm wood is what defines the look.
How much does an industrial chic van interior cost? This style typically adds $3,000 to $8,000 beyond a standard all-wood van conversion budget. Custom steel fabrication usually represents the largest share of that additional cost.
Does steel add too much weight to a van build? Steel can add meaningful weight if used for large structural elements, but selective use in hardware, trim, and small accents keeps the weight impact minimal. Weighing the van at each build stage helps track this throughout construction.
What wood works best with steel accents in a van? Lighter wood tones like ash or birch plywood contrast more sharply with dark or blackened steel than an already-dark wood like walnut does. This contrast is part of what makes the industrial aesthetic read clearly.
Can I add industrial steel accents to an existing van build? Many accents, like cabinet hardware, pulls, and small trim pieces, can be added to an existing build without major disruption. Larger structural elements are easier to plan into a build from the start rather than retrofitting later.
How do I keep an industrial van interior from feeling cold? Keeping wood as the dominant material and reserving steel for accents, paired with warm lighting and leather or fabric textiles, prevents the space from feeling cold. The balance should favor warmth over metal throughout.
What is the biggest mistake in industrial chic van builds? Using too much steel relative to wood is the most common mistake, tipping the interior toward feeling cold rather than warmly industrial. Keeping steel as a deliberate accent, not the primary material, avoids this problem.